Deployment Ninj@
Follow Us @
  • Home

Running Linux GUI on a remote machine

3/11/2013

1 Comment


The Magic of X Forwarding

*nix machines have been able to run software on a remote machine and display the GUI locally for decades. I'm always surprised to learn how many system admins are unaware of these features or didn't realize this could be done on windows , not just unix platforms. This is great for system admins as well as standard users who need access to specific linux applications , but lack the background information to navigate the system. Why not just use VNC? VNC is great , but many people frown on VNC because of potential security issues if VNC isn't setup correctly.
Windows users need two pieces of software: an secure shell program (ssh) to establish the remote connection and an X Server to handle the local display. For ssh on windows I will always recommend Putty. It's free and extremely versatile as well as cross platform which I also strongly support. Xming to my knowledge is the leading open source easy to configure XServer for Windows systems.
Putty is available at the following link: http://www.chiark.greenend.org.uk/~sgtatham/putty/download.html
Most users will only require putty.exe, I would recommend using the full windows installer.
Xming X Server for windows is available at the following link: http://sourceforge.net/projects/xming/

Configuring Xming

Once Xming is installed on your machine all that is required is to start it. Once launched it will display a X icon in the task try next to the system clock.

Configuring Putty

  1. Add Unix hostname
  2. Switch Connection type: to SSH
  3. Type name of session in saved sessions
  4. Click 'Save'
Picture
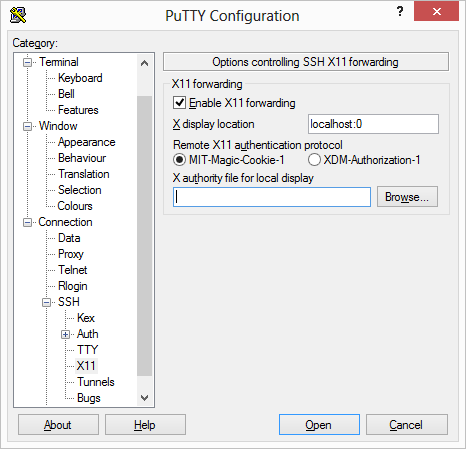
5. Expand the 'SSH' tab from the 'Category' list
6. Choose 'X11' from 'SSH' list
7. Check 'Enable X11 Forwarding'
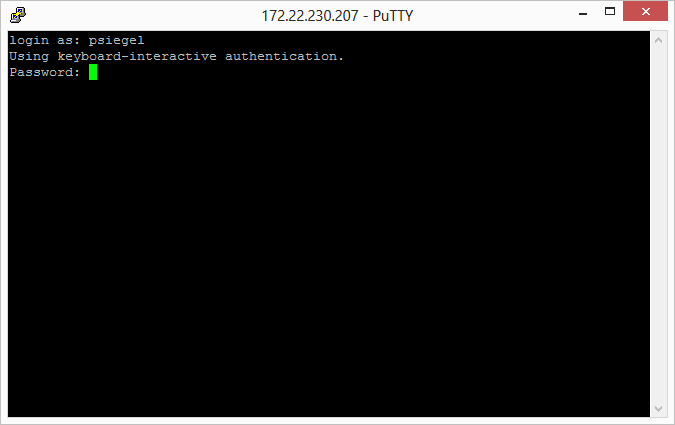
Picture
6. Click open
7. Enter your username and password for the linux system
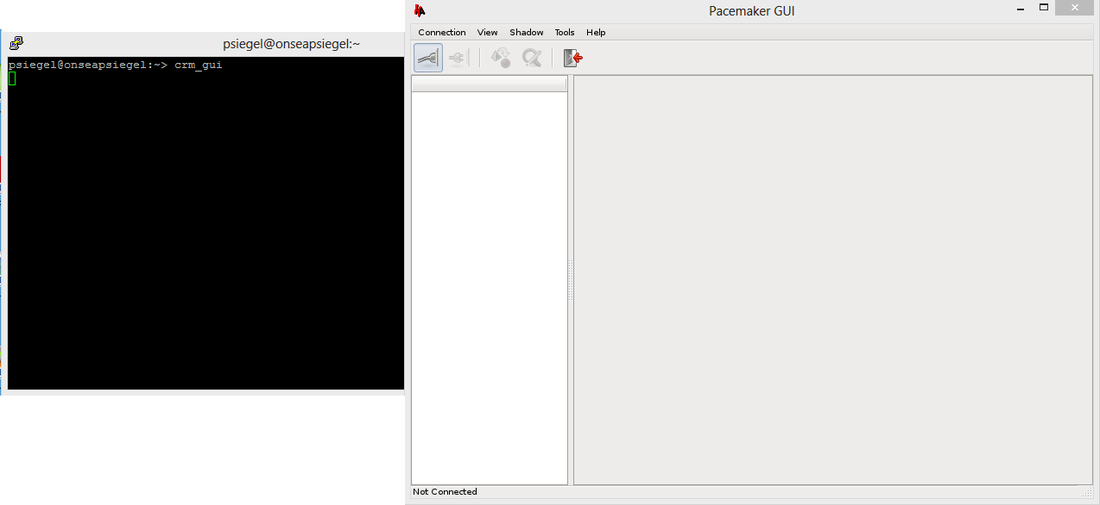
8. Start the app as you would from Terminal on the local system
9. Enjoy!
Picture
Picture

Other Operating Systems

X Forwarding can also be accomplished using native tools of Mac OS X+.  Mac users need to run "Applications > Utilities > XTerm". In a command line terminal run "ssh -Y [email protected] application_name
1 Comment

Windows 8 Self Healing Recovery

9/23/2012

2 Comments


Windows 8 first impressions Part 1

Microsoft Windows 8 will be available to the general public soon enough. I was fortunate through work to receive a copy of the Windows 8 Enterprise RTM.  I installed on a lower end machine I have for development and went about the standard install checking out what baseline drivers looked like , how profiles are handled , typical new operating system exploration. What happened next surprised me. The same week I was give an old box that someone was no longer using with a little better specs than my current development machine. Bare bones rig with an amd phenom. Nice upgrade to my current Intel core 2 duo. I moved my video card , hard drives , and ram over the new machine. I pulled out my windows 8 flash drive with the intent to reinstall on my new hardware. What happened next surprised me. I booted the machine and windows 8 actually loaded. The machine launched with a setup screen and proceeded to install new devices. Windows 8 actually changed hal and obtained the new device drivers and came back to life on it's own. I logged in to my normal profile and activation remained intact. Knowing about Windows to go I shouldn't have been surprised by this event , but Microsoft actually got something right. Now take this information and think about recovering workstations and your business model. No longer do we have to image and prepare a replacement machine, move user data and interrupt a half day of productivity to get a down machine back to the user. IT support is moving one step closer to that dream of leaving at 5:00 and enjoying weekends off.
Picture
2 Comments

Easily add drivers and updates to images with GUI DISM

7/29/2012

26 Comments


by Paul Siegel

Picture
One of the greatest advantages to using Microsoft for Imaging is the ability to perform offline image patching and keep images up to date rather than rebuilding your base image every time a major update or service pack is released. Deployment Image Servicing and Management (DISM) is the command line used to carry out these functions. If beginners  are more accustomed to other tools like Ghost Explorer or ZMG Explorer, then GUI DISM will make you feel right at home.

DISM GUI can downloaded from Mike's Blog at  http://mikecel79.wordpress.com/2011/11/30/dism-gui-3-1/

Updating an Image

 Create a folder for use as a mount point and then launch GUI DISM. Select the image file you wish to update under the Wim File heading and the folder you created under the Mount Location Heading. Then click Mount WIM. You should recieve a success message in the DISM Output pane.
Picture
Select the Drive Management Tab to the right of the default tab (Mount Control.) To add drivers to your image they must be extracted to their lowest .inf form, not as an executable. In the Add Drivers area select the folder where your drivers have been extracted. Check 'Force Unsigned' if necessary for the driver. In the image below the driver files to the left are an example of extracted drivers.
Picture
Click Add Drivers and the following window will appear:
Picture
This may run for some time depending on how many drivers are in the folder that was selected. You will know it has completed by watching the DISM Output pane. The DISM is Running progress window will close and the Output will look something like this:
Picture
Switch back to Mount Control tab and click Dismount Wim. You will be prompted asking if you want to commit changes to the wim. Select Yes and the wim image will be updated with the drivers you've chosen to inject into the wim. If you realize a mistake at this point you can select no and changes will be discarded. 
Picture
Again the DISM is Running window will appear for a while and once complete check the Output pane for any final error to make sure the operation completed successfully and wim is dismounted.
Picture
GUI DISM is a great tool for those who have not yet achieved "Zero Cool" status with a command prompt. Adding windows updates is completed using the same process under the Package Management tab. For updates this tool allows the injecting of .msp (windows installer patches) and .msu (microsoft updates) Thanks to mikecel79 for this great tool and please check out his blog at  http://mikecel79.wordpress.com/
26 Comments

Build a Portable Windows to Go Flash Drive

7/15/2012

15 Comments

 
By Paul Siegel
Every good computer nerd has a few live cds in their bag of tricks for emergency triage , virus removal , data recovery , and just plain fun. Some prefer Linux others WinPe. Imagine if you had a full copy of Windows with you that you brought every where you went. Not virtual but real Windows, All your programs, your profile , and your tools all at your disposable. Or better yet have a flash drive to hand to CEO's secretary for him to boot off while you take his hard drive and clean out that pesky virus he keeps finding. In Windows 8 Microsoft has made this a reality. This isn't some future innovation we will never see like Steady State for Windows 7. This is something that we can build right now with our Release Preview DVD's that  we've been drooling over for the past month. Still don't believe me? Check out this youtube clip from a developer that was at the Microsoft Build Conference:  
Time to Play Along From Home
What we'll Need:

A Machine Windows 7 or Windows 8 with the The Windows Automated Installation Kit (AIK) Installed.
 
The install.wim image from the Windows 8 Release Preview ISO

A USB flash drive (Preferably 32gb or more , but a 16gb will work, just not very well)

Step 1: Gather Our Tools

Install the Windows Automated Installation Kit located at: http://www.microsoft.com/en-us/download/details.aspx?id=10333  if you do not already have it installed.

Create a folder to use as our working directory for ease of access. I prefer c:\wintoflash.

Insert your Windows 8 Release Preview disc (I've only tested with 32bit) and located in the sources directory on the root of the disc is a file called install.wim. Copy that to your working directory. (c:\wintoflash)

Next navigate to C:\Program Files\Windows AIK\Tools\x86. We'll want to copy the imagex.exe and bcdboot.exe to our working directory (c:\wintoflash) If bcdboot.exe is not located in this folder then it can be copied from C:\windows\system32\

Now we've assembled the tools we'll need to build our bootable flash drive.
Picture
Step 2: Prepare The Flash Drive
The Flash drive needs to be partitioned and formatted to make a bootable NTFS drive. So we will have to run diskpart from an administrator level command prompt to prepare the drive.

Navigate to cmd in the start menu and right click and run as administrator to open the properly elevated cmd window.

Type Diskpart

The prompt will display DISKPART> at the bottom. Type LIST DISK to find the flash drive's disk number.

Type SELECT DISK 3 (or the number you discovered is your flash in the above step)

Type Clean this will erase all existing partitions on the flash drive.
Picture
Type CREATE PARTITION PRIMARY to create a new primary partition on the disk. you can verify this step by typing DETAIL DISK
Picture
Type format fs=ntfs quick to make the filesystem ntfs

Type ACTIVE to set the partition as Active for booting.

Type DETAIL DISK again to verify actions

Type Exit to leave diskpart utility
Picture
Step 3: Image(x) the Flash Drive 
Change directory to the working directory we created earlier by typing cd c:\wintoflash

Type imagex.exe /apply c:\wintoflash\install.wim 1 I: (I: is the drive letter of the flash drive yours may be different). 
Picture
Once the wim imaging is complete it's time setup the boot record by typing   c:\wintoflash\bcdboot.exe I:\Windows /s d: /f ALL
Picture
Step 4: Reboot and Enjoy 
That's it , you've created a portable windows 8 USB stick. On first startup it will prompt you for your windows 8 release preview cd key that came with your download. Each time you boot this flash drive in a new computer it will probe and install device drivers and take a while to boot up. Each boot after on that same hardware will be much faster. I look forward to a world where I can hand the  contractors that my boss hires an RSA key fob and a bootable flash drive and  let go about their merry way only to replace the two should something go bad. All new operating systems have the good and the ugly but this is one feature I am certainly looking forward too!
15 Comments

Automated Windows Deployment on a Budget

7/1/2012

54 Comments

 
by Paul Siegel
Picture
Funding for IT is at an all-time low.  If you have "champagne taste" but working with a "beer budget."  Microsoft Deployment toolkit is the way to go.  Lucky for us, the prompt-happy "Lite Touch" can be tailored into a much less intense experience if you follow the following process. 

 Feeding the Prompt-Monster
Picture
There at least 13 menus throughout the deployment wizard and we need to remove them all in order to automate! Lets start by skipping the Welcome and User Credentials screen.  We need to edit the bootstrap.ini for the deployment share.  In your workbench, go to "properties" of your open deployment share and select the "rules" tab  so removing them is required for automation (see below).

Picture
The default boot settings.ini will look something like this:

[Settings]
Priority=Default

[Default]
DeployRoot=\\DeployNinja\images$


Time to feed the monster its first can of answers.  All you have to do is add in the following line: SkipBDDWelcome = Yes to the bootstrap.ini to bypass the Welcome screen. The user credentials prompt is skipped by adding the following lines for the user account:

UserID=Ninja
UserPassword=Passw0rd1
UserDomain=DeployNinja


This account can be a domain account or a local server or workstation account depending on your setup. For this tutorial it is a local server account. The completed Bootstrap.ini file will look like this:

[Settings]
Priority=Default

[Default]
DeployRoot=\\DeployNinja\images$ 
SkipBDDWelcome = Yes 
UserID=Ninja
UserPassword=Passw0rd1
UserDomain=DeployNinja 


Once the bootstrap.ini has been edited the boot image will need to be regenerated in order for the bootstrap.ini it be copied into the deployment boot image. This done by updating the deployment share from the menu in the top right corner of the deployment workbench. In the end, when the litetouch.vbs script is executed you will bypass the first two prompts and arrive at the task sequence menu. See the images below for the end result.  Keep in mind that anytime you edit the bootstap.ini you will need to regenerate the boot images,

Picture
Since the primary goal for the most of us is to eliminate the need to enter a password, this will be the end of the road for some.  From this menu, a user can choose the desired software to install or choose to refresh the image on their computer. Others, however, prefer the ability to re-image machines from the ground up on a regular basis.  This is where Deployment Rules come into play. Back where we accessed the bootstrap.ini there is a set of rules to further fine-tune our deployment. 
Picture
Above is the predefined set of rules for our deployment share for the default installation.  From here we have the ability to customize the prompts that appear during the task sequence OR add additional functionality.   Below is an example of a custom rule set for a fully automated single task sequence.

[Settings]
Priority=Default
Properties=MyCustomProperty

[Default]


OSInstall=YES
SkipAdminPassword=YES
SkipApplications=YES
SkipAppsOnUpgrade=YES
SkipBitLocker=YES
SkipCapture=YES

SkipUserData=Yes 
SkipComputerName=YES
OSDCompterName=%SerialNumber%

SkipProductKey=YES
SkipComputerBackup=YES
SkipDeploymentType=YES

DeploymentType=NEWCOMPUTER
SkipDomainMembership=YES
JoinDomain=stinkycheese.deploymentninja.com
DomainAdmin=Administrator
DomainAdminDomain=stinkycheese.deploymentninja.com
DomainAdminPassword=Passw0rd1
SkipFinalSummary=YES
SkipLocaleSelection=YES
KeyboardLocale=en-US
UserLocale=en-US
UILanguage=en-US
SkipPackageDisplay=YES
SkipSummary=YES
SkipTaskSequence=YES
TaskSequenceID=BASE64
SkipTimeZone=YES
TimeZoneName=Eastern Standard Time

The real advantage of adding these rules in is that, if you want,  you can control how involved the user is in the task sequence. if you want the user to choose their computer name then you would change the line SkipComputerName=YES  to SkipComputerName=NO and the user can choose  the serial number as the computer name or something they specify. If you want to specify some of the settings but allow the user to pick the task sequence then remove the lines SkipTaskSequence=YES TaskSequenceID=BASE64, DeploymentType=NEWCOMPUTER. 

DeploymentType can have multiple options: the REFRESH option is used when executing the litetouch.vbs script inside of windows. NEWCOMPUTER would be used for deploying from Windows PE (Windows Deployment Services or LiteTouchPE.iso). 

Applications can also be added to the rule set to install across all task sequences without having to go back to edit them individuality by adding:


MandatoryApplications001=[guid of desired application]


The guid is automatically assigned to the application when the object is created in deployment workbench.

Domain Membership is not a requirement. If you choose to skip joining the domain you may also specify a workgroup=Ninjaland or You may also choose a specific OU in the domain by adding:

MachineObjectOU=OU=assasins,OU=Ninja,DC=local 


Rules, Wizards, and Prompts Oh MY!
 The customization is limitless and once you have a working automated deployment share there are endless means of executing your task sequences even without a pxe enviroment. For example one could use psexec to launch the litetouch.vbs on a remote machine or create custom shortcuts in the start menu that point back to the deployment share for a self service image scenario.  Happy deployments mean happy bosses , cheap deployments mean happy board members. 
54 Comments

    Paul Siegel

    Your Professional IT Jack of all trades.
    [email protected]

    Archives

    July 2013
    March 2013
    October 2012
    September 2012
    July 2012

    Categories

    All
    Games
    Google Apps
    Linux
    Paul Siegel
    Windows

    RSS Feed

Powered by Create your own unique website with customizable templates.